I got this question on Tumblr:
“Hi I… was wondering if you could talk more about that back to front thing you mentioned? Thx!!!!”
Back to Front is what I call a practice that I use for (traditional) opaque mediums (like acrylic paint, oil paint, sometimes gouache). It’s the technique/concept that I often like to use digitally.
Put simply, it’s painting stuff that’s in the back (“under” things) before painting stuff up front (“on top” of things). It gets you a more convincing result (if trying to be representational) and also saves time so you’re not repainting edges as much. It’s a pretty foundational concept that you should understand if learning how to paint.
Luckily, you don’t have to worry about it as much if you work digitally (because we have layers and there are lots of ways to put stuff behind your subject digitally– but it’s still not always as clean and it’s often more work), but if you don’t paint in a razor-sharp style with elements on each separate layer (hey, it’s pretty limiting to only have one technique, though) or in general if you want your art skills to translate to as many mediums as possible, hey, here’s a chance to learn it.
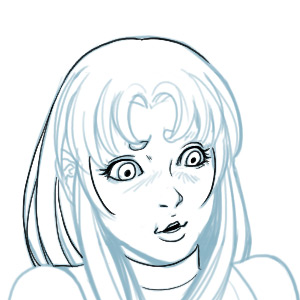
Here’s what happens without it. Say we have this little painting of a cartoon character:
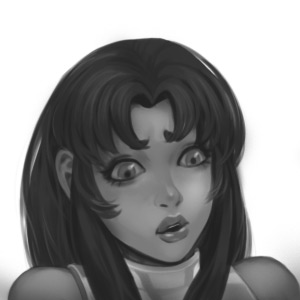
Wow, I had so much fun painting that, but oops, didn’t do anything for the background yet. Okay, I guess it’s time to add one in. We’ll just paint it around her:

Argh, well, I just wrecked those edges and haven’t even gotten into too much detail yet. The parts of her hair that blend into or need to layer over what’s behind her are gonna have to be painted again, and check out those circled areas— those are all places where we have to paint not one, but two edges (ugh, pain in the butt). Also, check out the arrows, showing this clearly obvious direction that the brush is going, in a place where I might not have wanted that. The shapes are forced to interact with the figure, forming that halo shape. Bleh, if you plan on putting anything back there besides blobs, it’s not gonna be easy…
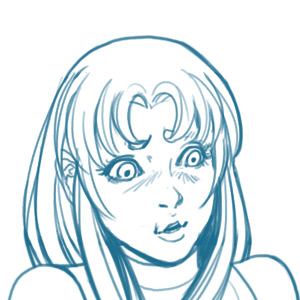
Let’s just paint back to front instead. ↑ It helps to have a sketch to refer to, so you don’t lose your forms. (When painting, you’d have a sketch on your canvas/underpainting, or if it helps, have a sketch on paper to overlay your piece while you paint to refer to.)
I don’t always have one as tight as this (though, gotta say, from experience the tighter my sketch is/the more planning I’ve done beforehand, the smoother/faster my execution goes), but let’s just use this sketch. (No, seriously, if you even plan out your shadows and stuff in the sketch phase, the final will just be soooo much easier. Use your sketch phase to experiment and make decisions, and you won’t have to worry about it in your final piece!)
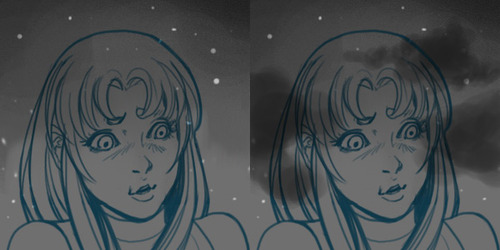
↑ Right away, I’m starting with the sky in back, moving to the stars, and then moving to the clouds up front. It looks natural to do it this way, when you want, say, little parts of those stars to peek out from under the clouds.
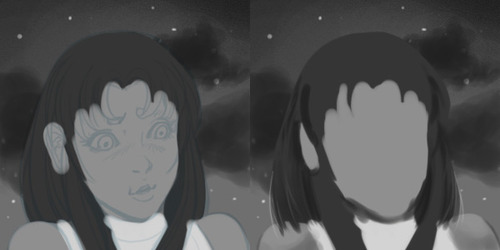
↑ Now, I blocked in basic shapes with “paint” because it helps me keep track of the whole piece, but here I’ve actually been careful about the back edges of the figure and especially her hair. Here, I’m painting her hair to be smaller than I want for its final shape, because when I put the edges down that’s it. Those shapes are final.
The strands of hair closer to her body, that I know will be overlapped by her shoulders, are just going to continue through because those lines end up looking more fluid than if I stopped painting at the edge of her shoulders. (Remember, the accidental halo? When we’re trying to avoid touching stuff our hands move accordingly.) Also I’ve got some more final/finer-looking lines there (those outer highlights) so that I can paint the shoulders right on top without ruining the details. The other thing I did here was paint in shadows of her neck, which will be both under her chest/neck guard and her head. There are also back shadows in her hair that I painted in, to be overlapped with other strands later (like her bangs, etc.).
Aaaand to demonstrate how this causes problems, notice how I started putting shadows on the shoulders before getting the hair taken care of. Oops, totally pointless at this stage.
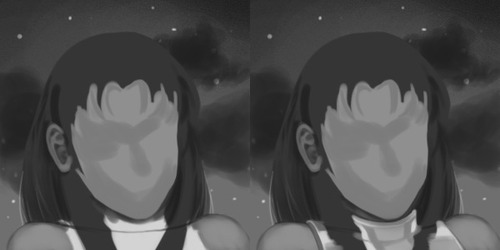
↑ See? Pointless. Yeah, I had to paint in those edges and the shapes all over again, on top of that hair. Also, what’s behind first acts as a reminder that there are all of these bigger, continuous forms beneath stuff that layers on top. I drew a line between her shoulders to keep that in mind, and I also painted more of her ear than we’re gonna see, and roughed in the shape of her jawline (and basic, basic shading on her face just to make sure those shapes make sense. Then, after her shoulders were taken care of, I could paint the neck guard on top of it (right).
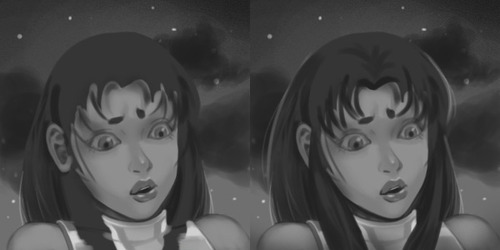
↑ (Left) Her face was next, so I started putting in details. Those highlights on her lips weren’t necessary to put on yet (Same reason why most super darks aren’t painted in yet), because it’s better to use highlights and darkest darks at the end to draw the eye around, but I’m living dangerously, haha. The other highlights (nose + eyes) are still dull, those are just placeholders. I can simultaneously work on the shadows of the eyeballs and eyelids at the same time because her dark eyelashes will be the top/final edge for both boundaries.
(Right) Now I’m layering more strands of her hair (adding those outer highlights, and layering strands over the background a bit. Ooh, the start of final lines/shapes! I’m also placing rough shadows for her bangs to sit on, and we’ve begun to put hair on top of her ear. Plus, I decided I wanted to darken the bottom of the image to draw the viewer’s eye towards her face. If I were oil painting this would be a glaze, but to do this at all, I had to decide that those shoulders were just done (yeah, yeah, I know you can just do it on a separate layer, but sometimes it’s more comfortable to paint on one layer).
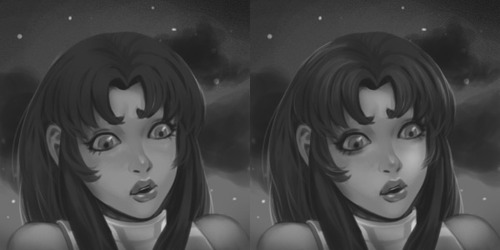
↑ (Left) Okay, final shapes, and final details on top! Now that all my major forms are in I can throw in tiny details all over the place.
(Right) More small details, and little tweaks in value (more lights, like on her hair and face, and then more darks, mostly around her eyes), because all of those forms can withstand light touches of value tweaks (and honestly it won’t kill anyone to soften stuff in minuscule ways). This is good enough for a stopping point. The progress:
That’s cool, but did you also know that this is a good concept when you’re inking digitally too? (Or using scratchboard, or using whiteout with your ink.) The DC Comics Guide to Inking Comics alludes to this technique.
If we’re doing digital inking let’s take advantage of the medium’s strengths! (In short, I’ll be using layers.) Let’s go:
↑ Taking that sketch, I’m starting to throw down lines that are underneath the objects, but look at all these problems I’ve caused, by not taking advantage of the whole point of my technique. It’s gonna be real subtle, but I’m just gonna trust you guys to see the subtleties or take my word for it until you do it yourself and see what I mean:
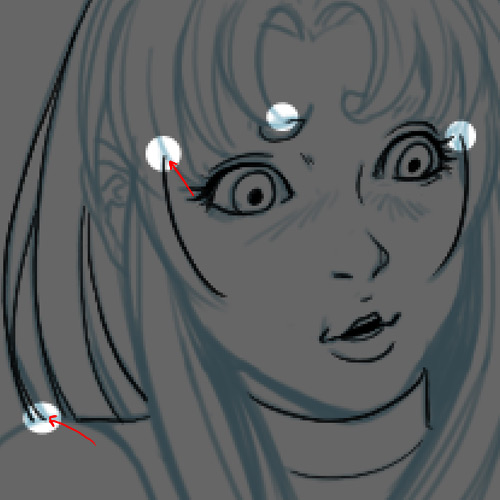
↑ See, the tips of these lines are problematic. They’re all sorta halting at the edge of objects and making the shapes less fluid, or might seem okay, but really are just wrong. Where I drew those arrows in, notice the very, very edge of those lines and where they’re bleeding into. Ugh, these lines are just poorly done because:

↑ With those edges, this is where I’ve implied the lines continue. I don’t want her eyebrow to be that shape. Her little side strands of hair are not growing out of her forehead, and that little strand on the bottom left, there, it’s not meant to be that short.
↑ Oh yeah, and insult to injiury, these strands that I’ve circled are just a touch stiff. I need the speed of my arm to draw nice flowing lines, but if I’m busy approaching an edge, that movement’s gonna slow down, and the shape’s gonna get a little stiff. Sigh. The only thing that looks fluid is the arc of her neck guard, because it’s a continuous shape. That’s the point of drawing back to front— it yields big, flowing shapes that are consistent.

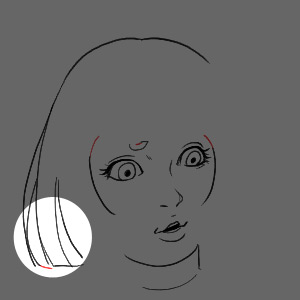
↑ Ugh, so after that sad failure I drew the hair again with swooshy arm movements (totally the technical term for that 😉 ). I’m not gonna layer every single line, but within reason, I’m starting with stuff behind before moving to the front. Get used to drawing big shapes and having smoother results by lifting your elbow off the table. (Not your wrist, not your hand, and ehhh, forearm’s okay depending on the size, but practice having your whole arm do it, your artwork and wrists/hands/fingers will thank you. It’s not easy at first, but practice making cool lines like that in your sketchbook, especially as a warmup!)
After this initial layer with stuff at the very back, I make a new layer, where I just draw what’s on top of the last object. I don’t draw in red when I do this for real, but each new layer is colored for you to see in the steps below:
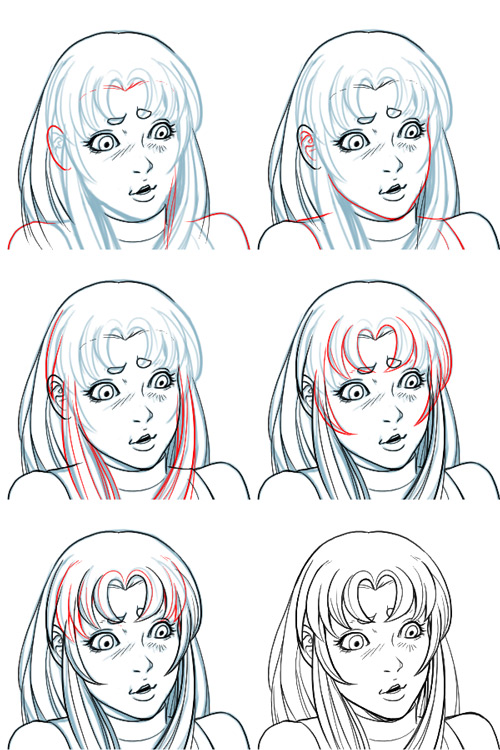
↑ The steps are pretty straightforward, up here.
- Draw what was on top of the last thing you drew. Draw as much of the shape as you need to keep track of those big forms, and keep everything logical (because as soon as you stop thinking about it, that’s when the shapes start to suck again).
- Erase whatever overlaps (it helps to see this when either one layer has a different color or different opacity, etc.). If you’re doing this on paper, this is where you use whiteout or something to cover the lines that overlapped, if you’re inking for production.Once it’s all erased (check by hiding/showing layers over again, while watching the changes), I merge those suckers.
- Start a new layer, do it again until you’re done with the picture. The cool thing with lineart is, once you have some basic forms in there, it doesn’t matter what’s on top and what’s under, because you can just make a new layer for anything you missed.
Here’s the progress: